
Before We Dive In
If you use Power Automate (Flow) and model-driven Power Apps, then (hopefully) you are aware of the “Common Data Service (current environment)” (CDS-ce) connector. Within this connector, there is an “Expand Query” option. This blog post will help explain how to use this.
Note: Check out Sara Lagerquist’s excellent blog called “CDS vs CDS: What Connector should I use in Power Automate?“. This will help you understand the difference between the Common Data Service connectors.
Let’s Dive In
Power Apps Solution
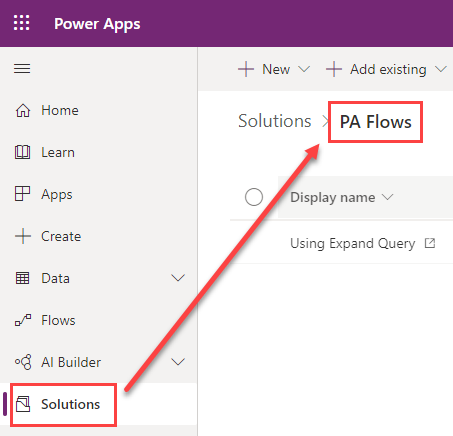
To get started, I have already created a solution within the Power Apps maker site called “PA Flows” (for “Power Automate Flows”). The next step would be to create a new flow within the solution.

Note: For this example, I have already started a flow with a Flow Button as the trigger. You can utilize whatever trigger you would like within your flow(s).
The Flow Setup
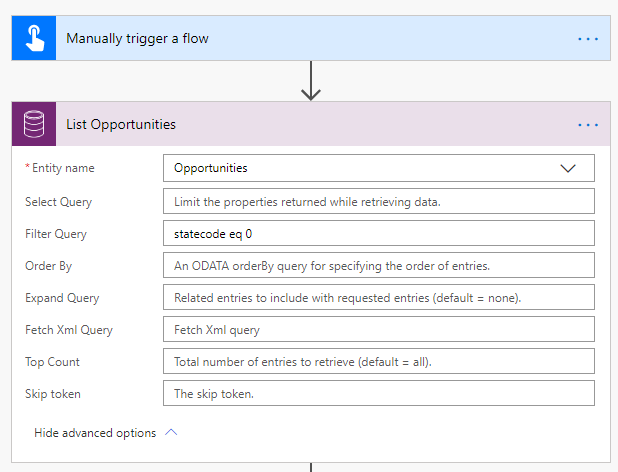
In the flow, I have a “List Records” action (renamed “List Opportunities”). In this example I am listing the Opportunities from Dynamics 365. I also have a simple ODATA “Filter Query” of “statecode eq 0” (0 = Active/Open).
Now, let’s check out what we can grab from the output of the “List Records” action. I would like to see if I can get the Opportunity’s:
- Associated Account’s name
- Associated Owner’s name and email address
- Associated Contact’s name
I inserted a “Create HTML Table” action to view the array output from the “List Records”.

As you can see above, the Account Name is not listed in the dynamic content when I search with “account”.
Using “Expand Query”
With the basic flow setup, let’s use the “Expand Query” option in the “List Records” action. First, you may be asking, “What do I put into this field?” Great question! And, there is a great solution.
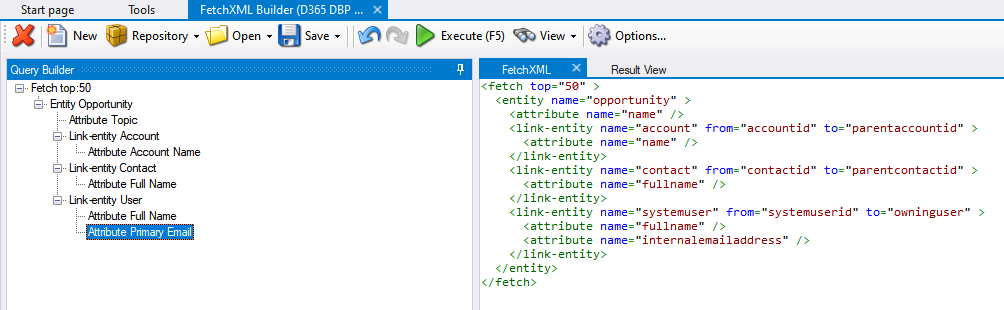
Open XrmToolBox and launch the “FetchXML Builder” from Microsoft MVP, Jonas Rapp.
As you can see below, I have created a simple FetchXML with “Opportunities” as the primary entity and have link entities to the Account, Contact, and User entities. For each entity I have added in a couple of fields.
The next step is pretty cool. Within the FetchXML Builder tool you can view the Power Automate Parameters.

Once this is selected, a small window will pop up with the values you will need for Power Automate.

Notice the “Expand Query” values listed? Keep in mind that right end of the field is chopping off what you see. Simply click on the “Expand Query” field and it will be copied to your clipboard. I have pasted the value into Notepad++ to show you the full value.

You can see the schema name of the related entity’s field followed by the selected field’s schema name.
Now, let’s see how this works inside Power Automate.
Back in Power Automate, I will paste in the newly copied “Expand Query” values into the “Expand Query” field on the “List Records” action.

With this field updated, this will now allow us to grab that information within our “Create HTML table” action.
First, let’s check to see if the “Account Name” is available. If you recall, this wasn’t available earlier.

As you can see above, the “Account Name” is now available!
What about the “Contact Name”? If you recall, we added this to the “Expand Query” field.

Yes! The Contact’s “Full Name” is visible and available to select.
OK… What about the Owner information?

Now let’s finish updating the “Create HTML Table”.

Testing the Flow
Now that we have the flow set up, let’s test it to see the output from the HTML Table.

As you can see, the table contains the information we need.
To further validate this, I put the output into an Excel file.

In Conclusion
By leveraging the “Expand Query” option, we saved many steps within Power Automate. For example, if you wanted to get the associated Account’s name, you would use the “Get a Record” action. However, since the Opportunities are in a list (array), once you link the “Get a Record” to the “List Records”, an “Apply to each” will appear. You would have to loop through all the Opportunities to link each one with the correct Account to then get the Account Name.
Whew! What a chore!
“Expand Query” can help reduce the complexity of your flows, reduce the number of API calls made, and speed up your flows.
Until next time!

I am trying to do exactly this, and my expand query fields do appear in the “output” of my flow after I run it, but I am not able to choose them as dynamic content in subsequent steps. They simply don’t appear. When looking at other blog posts, they first have to go through a JSON Parse step to pull out the values. I don’t see that mentioned anywhere here. Did you have to do it?
In my example I ran a List Records against Quotes, with an Expand Query for the quote creator. The output I get is below. Each Quote field has it’s own value returned, but the returned fields for creatdby aren’t dedicated fields. The seem to be an array of values all listed under the createdby field name.
How did you solve this?
“shipto_city”: null,
“totalamount”: 260000,
“_modifiedby_value”: “3c950bc3-cea8-e711-80ee-3863bb2e1388”,
“_modifiedby_type”: “systemusers”,
“importsequencenumber”: null,
“willcall”: false,
“createdby”: “{\r\n \”company_networkid\”: \”user123\”,\r\n \”domainname\”: \”user@emial.com\”,\r\n \”systemuserid\”: \”3c950bc3-cea8-e711-80ee-3863bb2e1388\”,\r\n \”ownerid\”: \”3c950bc3-cea8-e711-80ee-3863bb2e1388\”\r\n}”
}
LikeLike
Hello Jeff! The fields defined in the FetchXml for the Expand Query aren’t available in the output. The FetchXml is merely used to filter the data. So, if you have related entities in your FetchXml to help filter the data, the related entities aren’t available for the output. The output available is only for the entity selected in the CDS List Records step.
If you need to get the output from related entities, you will need to add another step. I would suggest exploring the “Relate Records” action available in the “Common Data Service (current environment)” connector. You find a reference to this in the article link below. There is a section in the article part way down called “Using the Relate Records action”.
Link to article: https://flow.microsoft.com/en-us/blog/work-better-with-the-common-data-service-in-power-automate/
LikeLike
Jeff – When you used the FetchXMLBuilder in the XrmToolBox, did you use the “Created by” as the connector (or link-entity) between the Quotes and Users entities?
I just ran a quick test and was able to pull the Full Name from the Users entity as an output. In the “List Records” step, I chose the “Quotes” entity and in the “Expand Query” field, I have this: createdby($select=fullname)
In the “Create HTML Table” action, I select “Custom” for the columns. I set the Header to have 2 rows with “QuoteNumber” and “QuoteCreatedBy”. In the Value column, I added in the dynamic content of “Quote ID” for the “QuoteNumber” and the newly displayed field of “Created By Full Name” from the Expand Query of the List Records (quotes) action.
The output of the HTML table when I ran the flow was the exact First Name and Last Name in plain text (string).
LikeLike
I was never able to get the fields from the Expand Query to appear as dynamic fields in later steps. I had to add a Parse JSON step to add the values to the list via an array. Below are my step for pulling a list of Opportunities and adding the Created By value.
Initialize Variable “Opportunity List” as an Array
Get a list of Opportunities with with Expand Query set as “parentaccountid($select=name),createdby($select=fullname)”
Apply To Each Opportunity from the list:
Parse JSON – Content = items(‘Apply_To_Each_2’)?[‘createdby’],
Schema =
{
“type”: “object”,
“properties”: {
“fullname”: {
“type”: “string”
}
}
}
Compose, Action = setProperty(items(‘Apply_to_each’),’createdby’,body(‘Parse_JSON’)?[‘fullname’])
Append to Array Variable – name = “Opportunity List”, Value = outputs from previous Compose step.
I can then refer to all my needed fields by using the output of the Array instead of the output of the Get a list.
See here for some additional detail: https://www.cloudfronts.com/how-to-use-expand-query-in-ms-flows/
LikeLike
I should also add that I’m guessing that I have to use this approach because my flow is not part of a Solution, so I can’t use the “current environment” connector. Outside of a Solution I think the CDS connector is older so may not support what you describe above.
LikeLike
Hello Aaron Back,
I did the same procedure that posted and it didn’t work, the Account and User fields didn’t appear.
It happened just like the one Jeff said.
Is there a step missing?
Thank you
Flavio
LikeLike
Hi Aaron,
Thanks for this – I was able to use the user IDs I pulled to act as the sender and recipient of a Dynamics email – as per another one of your posts.
One thing I noticed, is that there is no Expand Query option with the CDS current environment ‘When a record is created, updated or deleted’ trigger stage.
Maybe my thinking is bogus in expecting to see it here?
Thanks,
Donal
LikeLike